This is the second part of my description of the restoration work I did on a Geloso G.256 vintage tape recorder. Please find part one at following link:
In part two, I first did a gentle cleanup of the plastic enclosure of the unit, using some drops of soap in warm water, a paintbrush and a toothbrush.
Then it was time to look after the electronics. First of all, I measured voltages on socket pins of the two main tubes, the 12AX7 and the EL95. I found that all values were more or less as specified in the service manual. I decided to order two new tubes (just to make sure the unit was equipped with good ones), then I thought I could test the behavior of the unit with an old tape reel that had come with it.
The short video below shows the result (not that bad, I thought).
By the way, the song that the unit plays in the video was recorded from an old Italian TV show named "Canzonissima", in 1972.
When new tubes arrived, I put them into the unit and made a new test with the same tape. Frankly speaking, I didn't notice any special improvements. Anyway... well, now it was equipped with new tubes and it was time to reassemble the plastic enclosure and to complete my simple restoration attempt.
The replacement tubes: a EL95 and a ECC83 (12AX7)
The video below shows the final result. At the end of the day, I was satisfied with it. It had been a pleasure to play a bit with this little piece of history of consumer electronics in Italy.
The Geloso G.256 tape recorder (also known as the "Gelosino" for its compact design) was produced for John Geloso by an Italian manufacturer (the Magnetofoni Castelli company) near Milan. At following link you can find the story (in Italian) of Magnetofoni Castelli company and its collaboration with Geloso: La storia della registrazione magnetica in Italia - Castelli, Geloso -
Just during World War II the Arrigo and Attilio Castelli brothers had patented the so called "magnetophone", a device capable to record human voice on a thin metal wire. John Geloso had the financial and industrial resources to translate that brilliant idea into a successful series of consumer products, which started with model G.239 in 1949 (that still used a metal wire) and ended with model G.682 (the last of Geloso reel to reel tape recorders, as far as I know) in 1965.
The production of the G.256 model started in 1959. Here you can find some technical details and photos of it: www.radiomuseum.org
Here an illustrated sory of the Geloso company, mainly from an ham radio point of view: Geloso story
I received my G.256 unit as a gift from a dear friend. It belonged to her beloved father and had remained unused for long time. Mainly for this reason it was not working properly anymore, in particular in its mechanical assembly.
The following photos and videos describe the restoration work I tried to do to improve the general behavior of the unit.
How it was when I first saw it. Nice external conditions.
Opening the unit
Opening the unit
The bottom side with the electronics on a PCB
The mechanical assembly
Here below is how it worked when I first inspected it on the mechanical side:
Apart from a bit of dirt, which was normal for the age of the unit, the transmission belt was clearly not working properly anymore. I ended up with replacing it with a o-ring rubber gasket which seemed to fit the purpose nicely.
The remaing work was mainly dismounting and cleaning up the different parts. For cleaning, I used 99.9% isopropyl alcohol with a paintbrush and a toothbrush. For the metal chassis and parts I used some abrasive (polishing) paste for car use, applying it with cotton, then removing any residual dirt with alcohol. Alcohol in excess was in turn removed with compressed air.
Electrical contacts was polished with a normal contact cleaner. For lubrication I used small drops of a sewing machine oil, then removing any excess with cotton and alcohol. Only for the flywheel I used a silicon-based white grease, gently applied on flywheel supports by means of a toothpick.
Some other pictures follow:
The mechanical assembly and electronics decoupled
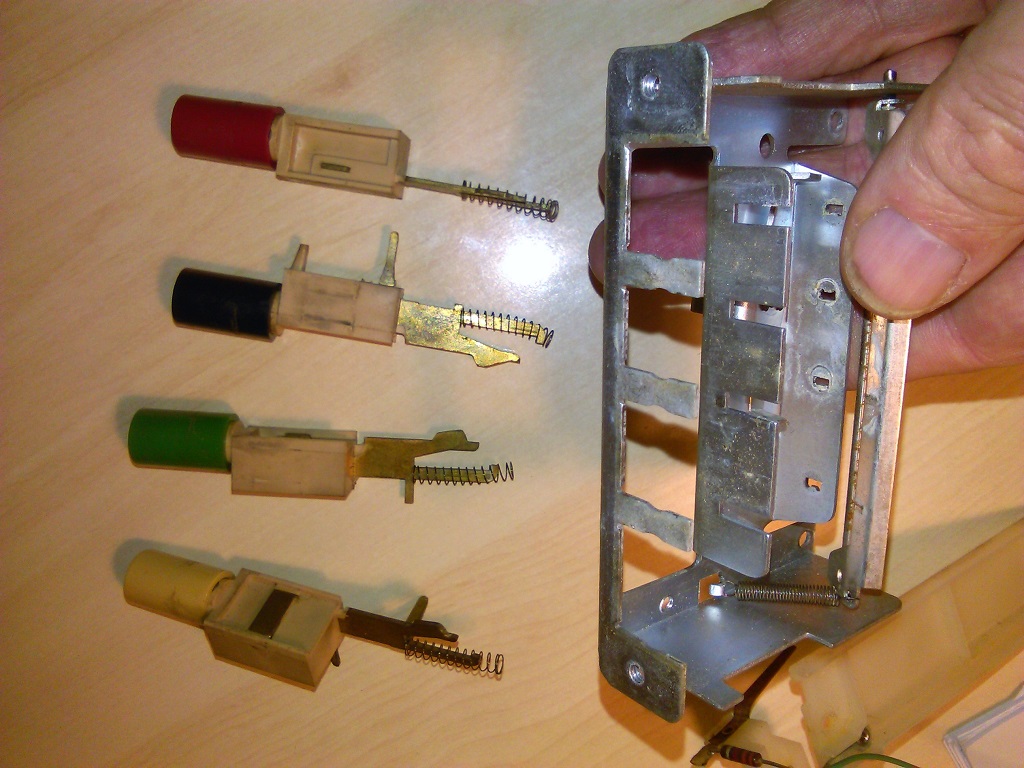
The push-buttons dismounted
The magnetic head sub-assembly
The rev counter sub-assembly
The rev counter driving wheel
The chassis after some cleaning
The magnetic head sub-assembly after some cleaning
The electronic board after cleaning - Solder side
The electronic board after cleaning - Component side
Here below is a short video with a first test just after having reassembled the mechanical assembly and the electronics together:
The rubber of the pinch roller had a mark (clearly visible in picture below) due to the fact that the roller had remained blocked in the same position for a very long time.
To remove the mark, I mounted the pinch roller on a long screw and inserted the screw in the spindle of an electric drill, then I gently sanded it down during rotation by using a small piece of 1000 grade sandpaper. Here below you can see the results. The mark is still visible, but significantly less deep than before. I preferred non to insist too much with sandpaper to avoid any risk to put the roller out of shape.
This is the end of first part of my restoration work. Second part will be about measurements and tests of electronics and finally about cleanup and re-installation of the plastic enclosure of the unit.
This post follows Part 2 on the same subject. As anticipated, I proceeded in the restoration project of my Panasonic DR-22 (also named the RF-2200BS) with trying to clean-up contacts of front-panel switches and potentiometers.
For this purpose I bought some products: a spray "dust remover" (compressed air) and a couple of well-known products from CAIG Laboratories: the DeoxIT D100 for switches and the DeoxIT Fader for potentiometes. Here below a picture of the toolkit, ready for use:
First step was to try to remove as much dust as possible from inside the case, the switches, the potentiometers and the tuning variable capacitor. Using a bottle of spray compressed air was quite appropriate for this operation, as illustrated by pictures below:
Next step was to use DeoxIT D100L cleaner to restore proper behaviour of contacts in front-panel switches. CAIG guidelines recommed to always wipe off excess of their products. However, wiping off excess is sometimes not possible, especially if the cleaner is applied into a semi-sealed part, like in my case. If this happens, CAIG recommend to just apply a small amount of their product into the part to be cleaned. Here is where the "small squeeze tube" type of applicator helps (compared to the more common spray type), as it allows providing small drops to the target device.
Final step was to apply the CAIG Fader F100L to the potentiometers, to restore and lubricate their internal contacts. Here again, the small squeeze tube applicator proven to be perfectly suitable for my needs:
Just after a single application of DeoxIT, I noticed a significant improvement in contact reliability of switches and in noise of potentiometers. Nevertheless, the 125 kHz marker switch will require a second application of DeoxIT, as it still works not perfect. I plan a second round for it just before re-assembling the unit in its case. Stay tuned for more RF-2200 restoration adventures.
Among first steps of almost any radio restoration projects is to dismantle the unit, both to ease deeper cleaning and to gain access to the circuit for visual inspection and - later on - for realignment and calibration. So I did. Attached below please find a collection of pictures showing the internals of my new old Panasonic DR-22 (refer to Part 1 for some more background on this story).
The solder side of the main board with the front panel controls exposed
The nice old-style mechanics of the tuning scale
The component side of main board with the tuning capacitor well exposed
Luckily, it seems that the unit does not have suffered from any major fault or repair in its past life. Internally it appeared fairly clean and in good order. After having removed the five self-evident screws on the back panel (only one of them is "hidden" inside the battery compartment) and the knobs on the front panel (all but the main tuning knob), both panels can be easily separated from the main circuit board so exposing that nice piece of vintage electronics.
It is very good for us experimenters that the whip antenna, the battery compartment and the loudspeaker can be easily disconnected from the main board without having to use a soldering iron. The radio itself can still stand up without the front and back panels and it can be very easily serviced this way, with a minimum risk of causing mechanical damages. Well done, old Panasonic designers!
The back panel dismounted with connections for antenna and batteries
Unfortunately while separating the front panel from the main board, a piece of plastic detached from around the signal meter (circled in yellow in image below). The other small rectangular piece of black gummy plastic silently dropped from inside the radio while detaching the back panel. I couldn't find out where it came from. I hope to discover its original placement while rebuilding the set.
Now I'm waiting for a stick of the renowned CAIG DeoxIT D100L conctact cleaner and another stick of DeoxIT Fader F5 for potentiometers. After having recovered a good behaviour of switches and pots I will proceed with a realignment. Stay tuned for more RF-2200 restoration adventures!
The rear of the front panel with the loudspeaker
The timestamp above says (I suppose) December 24, 1977
The venerable front panel dismounted and ready for a careful cleaning
Some time ago I wanted to buy a vintage portable receiver for trying a bit of MW listening with good performances even without the need of external antennas or the complexities of software defined radio (SDR). I went through the web and read a number of reviews and finally I choose to look for a used Panasonic RF-2200. I liked its look very much and felt it was just the kind of radio I was looking for. I found one on eBay in fairly good conditions and at a reasonable price (compared to how much these sets are usually rated). Also important it was that that National Panasonic DR-22 (also known as RF-2200BS) came from Europe, without the additional costs for shipment and long processing time at customs that affect similar purchases from the U.S.. Being targeted for the european marked, the DR-22 was also equipped with an AC mains selector (220V/50Hz or 110V/60Hz) so it can be used in Italy (where I live) without the need of an additional AC-AC transformer.
Here below a photograph of the set as it was depicted on eBay:
When the radio arrived in my hands, I quickly tested it to find out if it was fully functional, what of course was partially unexpected, given the age of the receiver. While it looked fairly goon on FM (where it was possible to receive many strong signals from local broadcast stations), apparently it was almost deaf on medium wave and shortwave bands. I knew a common problem with these sets is bad contacts in front panel switches and potentiometers due to long inactivity, dirt and oxidation. So I tried to operate them a bit and something started to come out of the speaker. Well, at least it seemed that there were no major faults. The short video below shows these initial tests:
OK, even after having verified that (apparently) the unit didn't suffer from major issues, it was still apparent that MW sensitivity was quite low and the same it was in SW. Probably a realignment was needed to improve the overall performamce. Also, the switches and potentiometers required a deeper and more durable cleanup. The service manual was available in digital format from the web. It was to time to plan a restoration. More on next episodes of my RF-2200 restoration adventures.